Thank you for reading my blog posts, I am no longer publishing new content on this platform. You can find my latest content on either mainawycliffe.dev or All Things Typescript Newsletter (✉️)
In this post, I am going to show you how to deploy angular apps to GitHub pages. You can think of GitHub pages as a free hosting platform that you can use to host client-based apps. You can host things like demos, portfolios, documentations etc. You can use it to host any client-side app as long as you comply to GitHub terms and conditions. You can Learn more about limitations of GitHub Pages here.
I am going to assume you already have an angular repository you wish to deploy to GitHub Pages. And are also familiar with the basics of Angular, Git and GitHub. You will need to clone the repository to your PC if you don’t have a local copy of the repository. There are two approaches for achieving this. In the first approach, we are going to do everything manually, while in the second approach we will rely on an NPM Package. Without further ado:
Deploying to GitHub Pages Manually
First, we need to build our angular app, but instead of using the usual build output path (dist/project-name), we want the output path at the root of angular cli workspace, in a directory called docs. We also need to specify the base URL for our angular app. The base URL will look something like this: https://USERNAME.github.io/REPOSITORY_NAME/, be sure to replace both the USERNAME and REPOSITORY_NAME with the appropriate names. So, our build command will now look like this:
ng build --prod --base-href https://USERNAME.github.io/REPOSITORY_NAME/ --output-path docs
If you look at the root of the angular workspace, there is a new directory, called docs, with the built application. The reason for not using the default build location (dist/project-name) is because GitHub Pages only allows you to set the source as either the root of your repo or the docs directory in the root of your repository.
And since we don’t want to mix up the project files and our build files, we chose the latter. Next, go ahead and commit the docs folder and its content and push the changes to your repository.
git push origin
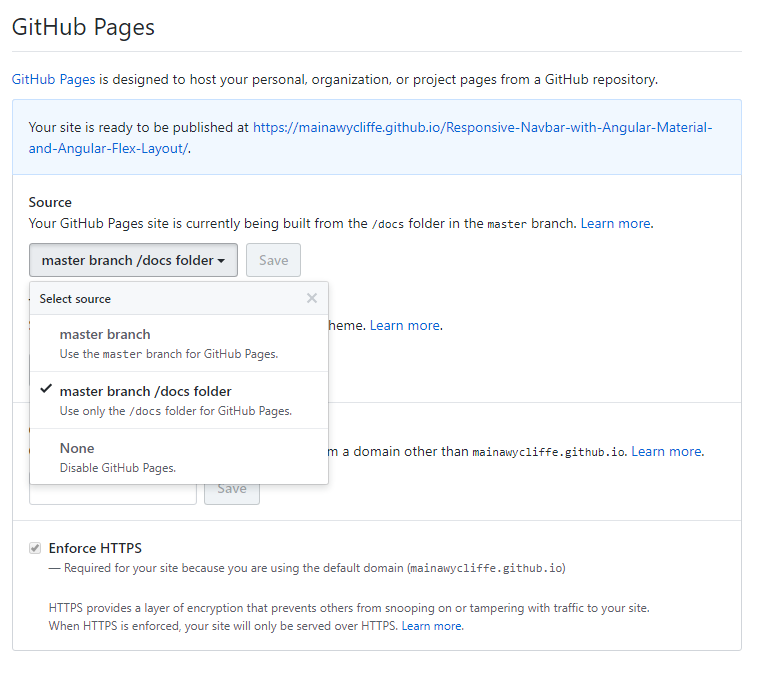
And then head over to your repository on GitHub, and then to the Settings tabs and then scroll down to GitHub Pages section. Then under source, select “master branch /docs folder” as the source for your GitHub pages. And finally save the changes.

And that’s it. To view your GitHub Page, navigate to the URL for your GitHub Page which will look something like this: https://USERNAME.github.io/REPOSITORY_NAME/. Or just click on the new link that has been placed just above source.
Using an NPM Package to Deploy Github Pages
If you found the above process, a little bit hard to remember, you are not alone. Thank fully, there is a library that can automate most the steps above. This library is known as angular-cli-ghpages. This is a command line to help deploy angular project to GitHub Pages. The first step obviously is to install the library as a dev dependency, using your favorite package manager:
npm i angular-cli-ghpages --save-dev

yarn add --dev angular-cli-ghpages
Then, build your project. This time there is no need to change the output directory, but you need to set the base URL. The base URL will look like this: https://USERNAME.github.io/REPOSITORY_NAME/, be sure to change both the username and REPOSITORY_NAME appropriately. So, your build command will look like this:
ng build --prod --base-href [https://USERNAME.github.io/REPOSITORY_NAME/](https://USERNAME.github.io/REPOSITORY_NAME/)
After build completes, you just need to run the following command:
npx ngh --dir=dist/[PROJECT-NAME]
Where PROJECT-NAME is the name of angular project you are deploying. If you are using Angular 5 and below, run the command without the project-name:
npx ngh --dir=dist
And that’s it, the library will do everything including configuring the page option for you on GitHub. You can now visit your GitHub page url: https://USERNAME.github.io/REPOSITORY_NAME/ to see your deployed angular app.
Tip
You can shorten the build and deploy command using NPM scripts. Open your package.json and then, in your script section add the following script.
"scripts": {
    // ...
    "deploy": "ng b --prod --base-href https://mainawycliffe.github.io/angular-images-lazy-loading-demo/ && npx ngh --dir=dist/angular-images-lazy-loading-demo"
},
And now, you can build and deploy to GitHub Pages with a single command:
npm run deploy
Final Thoughts
There are other methods you can deploy your angular project on GitHub Pages. But this two are once am comfortable recommending. Personally, I prefer the second option as it easier and can be heavily automated as compared the first one. If you have a topic suggestion you would like me to cover, you can suggest in the comment section below or get in touch with me on Twitter: @mwycliffe_dev.